Why Soffit and Fascia Matter More Than You Think
Most homeowners don't think about soffit and fascia until something goes wrong. Then it's suddenly urgent.
You're planning a gutter replacement and the contractor points to soft spots along the fascia boards. Or you're getting quotes for siding and everyone mentions the fascia needs work first. Maybe you're noticing paint peeling along the eaves or seeing daylight through gaps in the soffit.
Here's what's actually happening. Your fascia creates the structural mounting point for gutters. When it rots or warps, gutters pull away, water overshoots, and the problem accelerates. Your soffit provides attic ventilation — critical in Wisconsin's climate where temperature swings create moisture issues. Without proper ventilation, you're inviting ice dams in winter and heat buildup in summer.
The hidden cost of waiting: Rot spreads from fascia to roof decking to rafter ends. What starts as a $2,000 fascia replacement becomes a $6,000+ structural repair when you wait too long. Homeowners in Appleton and Green Bay see this progression every renovation season.
New construction is simpler — you're choosing materials and installation methods before problems develop. But even then, the choices matter. Vinyl soffit installed without proper ventilation panels creates moisture problems within five years. Wood fascia without correct priming fails fast in our freeze-thaw cycles.
The transformation isn't just cosmetic. Properly installed soffit and fascia create a sealed, ventilated system that protects your roof structure, supports your gutters, and maintains your home's value. You're not just covering the eaves — you're building a foundation that everything else depends on.
This is infrastructure dressed up to look good.
What Does Soffit and Fascia Installation Cost in the Fox Valley?
The material you choose determines most of your cost. Everything else — labor, complexity, access — stays relatively consistent.
For a typical Fox Valley home with 150-200 linear feet of fascia and soffit combined, expect total costs between $2,400 and $4,000 for vinyl, $3,000 to $5,000 for aluminum, and $4,500 to $7,000+ for wood or premium composite materials.
Material Costs by Type
| Material | Cost per Linear Foot | Lifespan | Maintenance | Best For |
|---|---|---|---|---|
| Vinyl | $8-$12 | 20-30 years | None | Budget-conscious, modern homes |
| Aluminum | $10-$15 | 30-40 years | Minimal | Durability priority, coastal/lake exposure |
| Wood (Cedar/Pine) | $15-$20+ | 15-25 years | Annual painting/staining | Traditional homes, historic character |
| Composite/PVC | $16-$22 | 40+ years | None | Premium performance, maintenance-free |
Those numbers include materials and installation. Vinyl costs less upfront but offers fewer color options — most Oshkosh and Neenah installations use white or almond. Aluminum provides durability with more color choices, powder-coated to match your exterior. Wood delivers authentic appearance but requires commitment to maintenance in Wisconsin's weather.
Labor and Complexity Factors
Standard ranch-style homes with easy access install quickly. Two-story homes, complex rooflines, or limited access increase labor costs by 30-50%.
Removal and disposal of old materials adds $400-$800 to most projects. If the contractor discovers rot in the fascia boards or rafter ends during removal (common in homes 20+ years old), repair work runs $30-$50 per linear foot for board replacement plus labor.
Vented soffit panels cost $1-2 more per linear foot than solid panels, but they're not optional — they're required for proper attic ventilation. Most Fox Valley installations use a 50/50 mix of vented and solid panels, alternating for consistent airflow.
Material waste typically adds 10-15% to material costs due to cuts, corners, and mistakes. Professional installers factor this into quotes, but DIY attempts often require second trips to the supplier.
A complete tear-off and replacement for a 1,500-square-foot ranch in Kaukauna typically takes 2-3 days with a two-person crew. Faster than you'd expect, slower than you'd hope — and heavily weather-dependent during shoulder seasons.
The Soffit and Fascia Installation Process
Professional installation follows a specific sequence. Skip steps or reverse the order, and you create long-term problems.
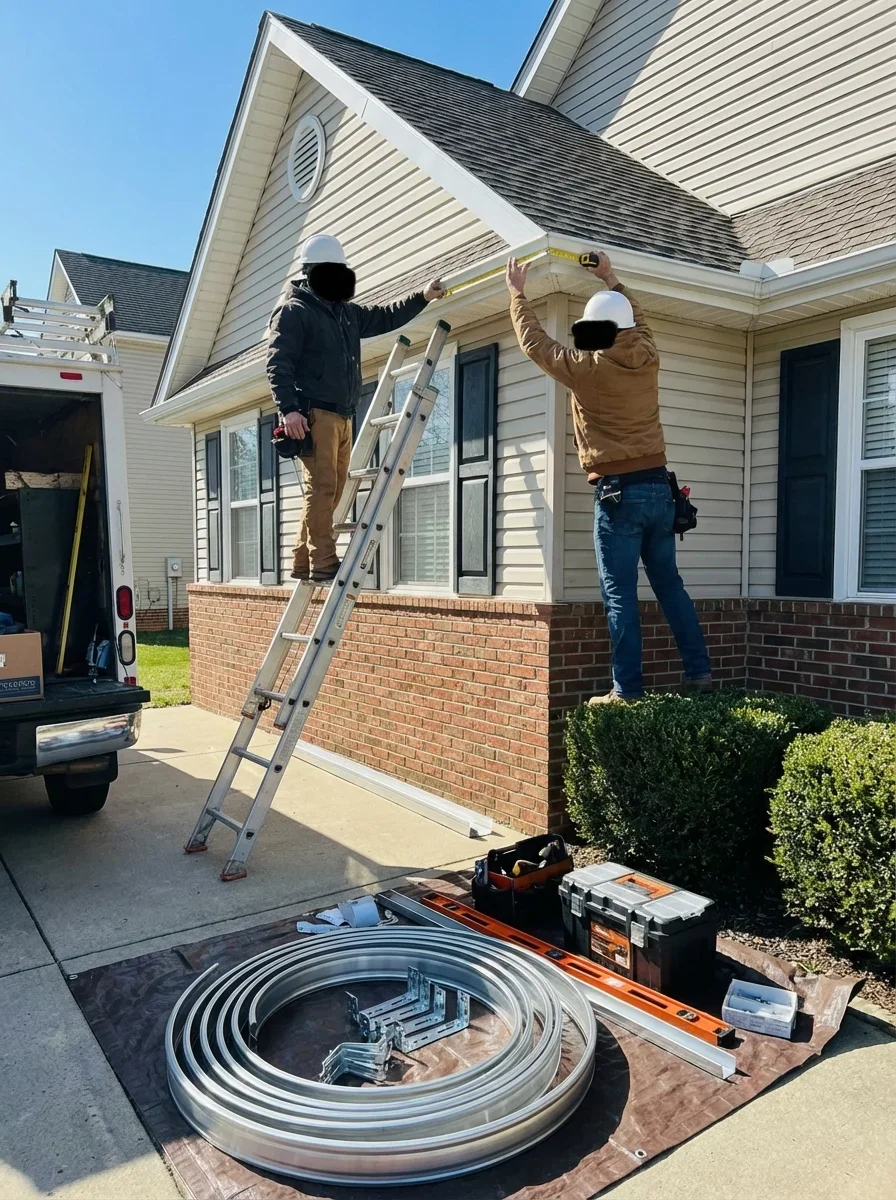
Inspection and Preparation
The work starts with complete removal of old soffit and fascia materials. This reveals the condition of underlying wood — the fascia boards, lookouts, and rafter ends that actually support everything.
Critical checkpoint: Your contractor should inspect every linear foot of exposed framing before installing anything new. Soft spots, discoloration, or crumbling wood indicates rot that must be addressed now. In Green Bay and Appleton, contractors routinely find rot on north-facing eaves and areas below valley transitions where ice dams concentrate.
Any damaged wood gets cut out and replaced with pressure-treated or primed lumber. This adds time and cost but prevents installing new materials over failing structure — a guaranteed callback within five years.
Fascia Board Installation
New fascia boards (or fascia covers if boards are sound) install first because they create the mounting surface for soffit panels. For wood fascia, each board gets back-primed before installation to seal all six sides against moisture. Aluminum or vinyl fascia wraps over existing boards if they're structurally sound but cosmetically worn.
Proper installation includes flashing at the top edge where fascia meets the roof deck. This metal strip (often aluminum, sometimes galvanized steel) directs water away from the joint and prevents moisture intrusion behind the fascia. Many low-cost installers skip this detail. You'll notice within three years.
Soffit Panel Installation and Ventilation
Soffit panels install after fascia is secured. The panels span from the house wall to the fascia, creating the underside of your eave overhang.
- Install receiving channels along the house wall and along the back of the fascia
- Cut panels to exact width (measuring at multiple points because older homes are rarely square)
- Slide panels into channels with proper expansion gaps (critical in Wisconsin — materials expand and contract significantly with temperature swings)
- Alternate vented and solid panels according to ventilation requirements (most codes require 1 square foot of ventilation per 150 square feet of attic space)
- Seal all transitions at corners, fascia joints, and wall penetrations
Vented soffit panels have perforations that allow air intake while keeping insects and debris out. This intake ventilation works with ridge vents or roof vents to create continuous airflow through your attic — essential for preventing ice dams during Menasha winters and reducing cooling costs during summer.
The finishing details separate professional work from amateur installations: corner treatments that don't gap, consistent reveals, caulking only where appropriate (never across expansion gaps), and clean transitions at gable ends.
Timeline expectations: Spring and fall provide ideal installation conditions in the Fox Valley. Summer heat makes materials expand during installation, potentially causing buckling when temperatures drop. Winter installations risk brittle materials and caulking that won't cure properly below 40°F. Plan installations for May-June or September-October when possible.
How to Choose a Soffit and Fascia Contractor
The lowest quote almost always becomes the most expensive option. Here's why.
Essential Credentials and Experience
Start with contractors who carry general liability insurance and workers' compensation coverage. Soffit and fascia work happens on ladders and scaffolding — injuries are common, and you're liable if workers aren't properly covered. Ask for certificates, not just verbal confirmation.
Experience with your material matters. A contractor who exclusively installs vinyl may not understand the fastening requirements for aluminum or the priming protocols for wood. Ask specifically about their experience with your chosen material type.
Questions to ask every contractor:
- How do you handle rot discovery during installation? (Get the process and pricing structure)
- What's your ventilation calculation method? (Should reference attic square footage and building codes)
- Do you install drip edge and flashing at fascia joints? (The answer must be yes)
- What expansion gaps do you use for [your material]? (Specific numbers indicate experience)
- How do you handle complex transitions — valleys, gable ends, bay windows?
Check recent projects in your area. Soffit and fascia installed in Appleton two years ago demonstrates how materials weather in your specific climate. Drive by completed projects if possible — look for uniform appearance, straight lines, and tight corner joints.
Warning Signs to Avoid
Walk away from contractors who quote over the phone or from ground-level photos. Proper quotes require visual inspection of existing conditions, measurement of all runs, and assessment of access challenges. Remote quotes either pad costs to cover unknowns or lowball to win the job, then upcharge during installation.
Pressure to bundle unrelated services often signals commission-based sales rather than contractor expertise. Yes, soffit/fascia naturally pairs with gutter replacement — they share mounting points. But bundling with roofing, siding, windows, or other exterior work deserves separate evaluation.
Red flags during the quote process:
- No mention of removing and inspecting old materials before pricing repairs
- Identical pricing for all material types (each has different labor requirements)
- Inability to explain ventilation requirements for your specific roof configuration
- Quotes without measurements or linear footage calculations
- Push for immediate deposits or "today only" pricing
The right contractor explains why certain materials suit your home better than others. They point out potential problems during the site visit — existing rot indicators, inadequate ventilation, incorrectly installed flashings. They provide itemized quotes that break down materials, labor, and contingencies separately.
References matter less than you think — every contractor provides glowing references. Online reviews from the past 12 months give better insight, particularly reviews that mention problem-solving or unexpected discoveries during installation.
The contractor you choose should make you more confident about the project, not more anxious about the decision. Trust that instinct.
Frequently Asked Questions
Soffit and fascia replacement costs vary by material, home size, and local labor rates. In Wisconsin, expect the following ranges:
| Material | Cost per Linear Foot | Total for 200 LF (avg home) | Notes |
|---|---|---|---|
| Aluminum | $8–$15 | $1,600–$3,000 | Most popular; durable; low maintenance |
| Vinyl | $7–$12 | $1,400–$2,400 | Affordable; not paint-able; moderate lifespan |
| Steel | $10–$18 | $2,000–$3,600 | Heavy-duty; corrosion-prone in Wisconsin winters |
| Wood | $12–$20 | $2,400–$4,000 | Classic look; requires staining/painting; prone to rot |
| Composite | $15–$25 | $3,000–$5,000 | Premium; mimics wood; very durable |
Labor: typically $50–$150/hour; most jobs take 1–3 days. Total installed cost: $2,500–$6,500+ depending on size, material, and complexity. Get 3 quotes from local contractors (roofers, carpenters, or gutter companies).